
I recently finished reading “The Gunslinger,” volume I of Stephen King’s epic fantasy, The Dark Tower. If you have not read it, I recommend picking it up and giving it a go. Although this doesn’t really pertain to Magento CMS pages, maybe it can be related to your own personal journey through the desert wasteland of Magento development; trials overcome, extensions extended, dark wizards bested, core files liberated, and nerf guns blasted. Maybe it’s a stretch of the imagination, or maybe I’m just looking for a loopy introduction to a blog post on creating custom pages in Magento using frontend routers.
So, do I have your attention? Good, let’s get started. (If not you can read about nerf gun mods and, once you’re good and ready, come back for the Magento development stuff).
There were a couple mentions that links were broken in the post below.
I went back and copied code snippets in where they used to be. If anyone is interested in this still, comment and let me know and I will package this up into a downloable module. Thanks! (07/08/2017)
If you’re looking to create a custom route in Magento 2, see this ARTICLE WITH DOWNLOADABLE M2 MODULE
Getting Started:
Sometimes when building Magento sites it is necessary to create custom pages outside of the CMS. For example, if you are trying to create some kind of custom contact form, site survey, or any other type of page that needs to render custom code which cannot be included inside of a CMS page. On doing a little light research through the Magento forums, Moshe makes a great point here in saying that having the capability to enter PHP code into the admin panel can pose security risks (not to mention that malformed code can render the white screen of death).
For store owners, this can seem like a daunting task if you do not have a developer on staff. However, with this tutorial in hand, hopefully you will be able to create a page with a unique URL and custom template easily. We can even execute some basic code to show how a page like this can be used in a real life scenario.
Let’s get to it.
(Please note that all development of this nature should be performed on a development server or local running instance of Magento. And of course, backup your application files)
Step 1: Navigate to WebRoot
Open up your filesystem and navigate to the webRoot on your development environment. Initially, we are going to be interested in two directories:
1. app/code/local
2. app/etc/modules
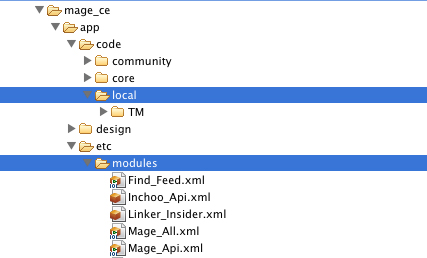
Step 2: Create the Local Extension Directory
Within app/code/local we are going to create a folder called “Yoursite” where Yoursite is going to be replaced with an abbreviation of your site domain. This directory will serve as the location for our local site extension.
Step 3: Create the Extension Package, IndexController, and Config Files
Inside of the directory you just created (Yoursite), we are going to create a package folder. You can call this whatever you want, but I like to name them descriptively so I can always understand the reference if I need to go back to it.
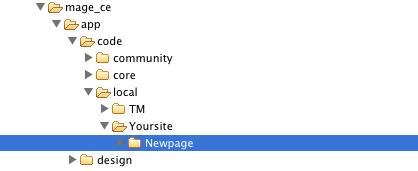
Now create two more sub-directories, one called “controllers” and one called “etc”. Within “controllers”, create a file called IndexController.php. Within “etc”, create a file called config.xml. The whole structure should look like this:
Step 4: Setup IndexController.php
The index controller is where we are going to tell Magento which class we are overriding and create a block that we can use to fill with our custom phtml page. Don’t forget to replace “Yoursite_Newpage” with the naming schema you’ve been using. Let’s take a look.
<\?php
class Yoursite_Newpage_IndexController extends Mage_Core_Controller_Front_Action
{
    public function indexAction()
    {
        //Get current layout state
        $this->loadLayout();

        $block = $this->getLayout()->createBlock(
            'Mage_Core_Block_Template',
            'newpage',
            array('template' => 'newpage/content.phtml')
        );

        $this->getLayout()->getBlock('root')->setTemplate('page/1column.phtml');
        $this->getLayout()->getBlock('content')->append($block);
        $this->_initLayoutMessages('core/session');
        $this->renderLayout();
    }
}
Step 5: Setup config.xml
The config.xml is where we are going to instatiate our module, set the URL name of the page, and potentially setup a layout xml file to use. Again, don’t forget to replace “Yoursite_Newpage” with the naming schema you’ve been using. Let’s take a look.
If you do not need to modify the layout of this page, IE there is just going to be some HTML and a little bit of PHP, you can remove the layout piece from the xml (The part that looks like the below codeblock).
  <\layout>
      <\updates>
        <\newpage>
            <\file>newpage.xml<\file>
        <\newpage>
      <\updates>
  <\layout>
Step 6: Create the module xml file
Hang in there, we’re almost finished! The module xml file serves as a sort of directive for Magento, telling it that there is an extension and where it is located.
Go ahead and create a file called “Yoursite_Newpage.xml” in app/etc/modules/ with this content:
<\?xml version="1.0"?>
<\config>
    <\modules>
        <\Yoursite_Newpage>
            <\active>true<\active>
            <\codePool>local<\codePool>
        <\Yoursite_Newpage>
    <\modules>
<\config>
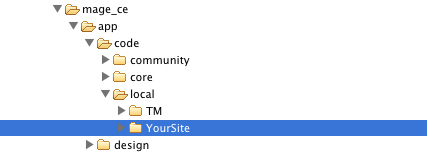
As you can see from the screenshot, we are declaring the module as “active” and directing Magento to look into the local codepool to find our extension, located at “Yoursite/Newpage”. Easy, right?
Step 7: Create your phtml content page!
You’ve made it this far, you might as well see it through to the end. Navigate to:
app/design/frontend/YourTheme/YourTheme/template
Once in your templates directory you are going to create a folder called “newpage” with a file in it called “content.phtml”. This is a reference from Step 1 when we set up our IndexController. If you look back at line 12 you will see where we designated where our template was going to be located.
Line12 array('template' => 'newpage/content.phtml')
Now is when we can begin to populate our page with custom content and PHP code.
<\?php
if(Mage::getSingleton('customer/session')->isLoggedIn()):
$name = Mage::getSingleton('customer/session')->getCustomer()->getName();
endif;
\?>
<\div class="box">
<\div class="box-content">
<\h4>
<\?php if(Mage::getSingleton('customer/session')->isLoggedIn()): echo "Welcome" . \$name . "!"; ?>
<\?php else: echo "Welcome, Guest!"; endif; \?>
<\h4>
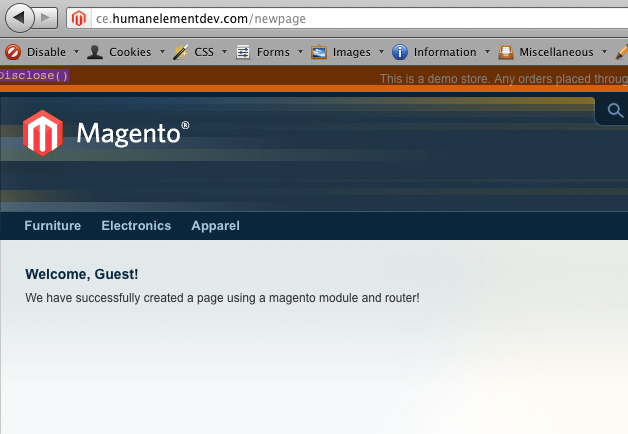
<\p>We have successfully created a page using a magento module and router!<\p>
<\div>
<\div>
Well that’s it, now you could play around by adding some adminable content on the page for store managers to maintain by dropping in this code: (change block ID to the ID of the block once you create it within CMS → Static Block).
1. <\?php echo $this->getLayout()->createBlock('cms/block')->setBlockId('block_id')->toHtml() \?>
Check out our cool new page here:
As always, if you have any questions or issues, post a comment and I’ll try to help you out!