As a well-versed account manager, I’ve seen my fair share of site launches in Magento. And while I familiarize myself with Magento 2 more and more every day, there are still functions I struggle with.
During a M1 to M2 replatform and redesign for a client, I went down the Magento 2 Product Import rabbit hole. But I came out the other side with only a few bumps and bruises to my pride. For anyone who has worked with Magento product imports, you’re likely familiar with the feeling. Want to save yourself from a few grey hairs? Read on to learn from my mistakes (or skip ahead to where I finally got it all right!)
During the Planning & Design phase of the project, we interviewed customers and discovered that the category structure and navigation needed to be adjusted to meet their needs and expectations for better usability. During implementation, we built entirely new categories in the Magento 2 site.
We used the Magento 1 to Magento 2 Data Migration Tool to migrate all of the products from their existing production store to the new M2 instance, and we planned a separate import to assign the products to the necessary categories after they were migrated.
The client went through the tedious exercise of assigning their products to the new categories we created in Magento 2 using an excel spreadsheet with two data points – the SKU and the Category IDs that the products needed to be assigned to. Each category was in a different column, not in a comma separated list.

With Magento 1, I could have worked with this pretty easily. Do some quick concatenation and we’re good to go. Magento 2 is a different beast. This is where the journey really begins.
Before getting started with any data imports, make sure you get a backup of a database in case things don’t go as planned. (This definitely saved my ass!)
Attempt 1: Run the Import and See What Happens
In my first attempt, I did the import with the SKU and Category IDs to see what happened. Don’t do that. It just creates a Category with every single Category ID as the name. Your category tree will look a little like this:
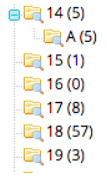
Unfortunate. Thank goodness for that Database Backup!
Attempt 2: Use the Category Names
Starting fresh, I thought that I needed to provide the category name in the import. ‘Find & Replace’ was my friend in this spreadsheet journey. A developer ran a script for me to get all of the Category IDs and Category Names. I used ‘Find & Replace’ to get all of the IDs replaced with the appropriate Category Name. I needed a formula to combine each cell in the row, combining with a comma, removing the comma for any cell that is blank.
Example:
Take what’s in Row 2 – Column B, C, D, E, F, G, H, I & J and put them into one cell, separated by commas. If there is no value in any of these cells, skip it.
=JOIN(", " , FILTER($B2:$J2, NOT($B2:$J2 = "") ))
This worked great! I now had two columns – SKU and Categories, with the categories being a comma separated list. I checked the data (a handy feature with Magento 2 Imports), and the data looked good. I ran the import, and I thought I was in the clear. No errors! Woohoo! Too good to be true? Of course it was.
I looked at the categories on the front end of the site – still empty. I cleared cache, and ran a command line reindex. Still nothing. Same thing on the backend – the category tree was empty.
Clearly it didn’t work. At least this time, I didn’t need to use the database backup!
Attempt 3: Export an Already Categorized Product
This time, I was going to be smart. I added a product manually to a category, and then ran a product export. In hindsight, this is the first thing I should have done. Upon reviewing the export, it became clear that you need the category path, not just the category name. This makes sense, because I guess you could have the same subcategory name under different top level categories. ‘Find & Replace’ was once again my saving grace. Find all of the category names and replace with the category path. Done.
Find: Subcategory
Replace with: Default Category/Parent Category/Sub Category
I now had a list of category paths, in a comma separated list and was ready for approach number 3.
Default Category/Parent Category/Sub Category, Default Category/Parent Category/Sub Category, Default Category/Parent Category/Sub Category
Third time’s the charm, right?
This took quite a bit longer to run, so I was hopeful. It completed without errors, and this time I got the notification in the admin that says to clear the cache and reindex. First time I saw this, so I was hopeful! It did something….but was it what I wanted? Yes! Sort of.
The parent categories now had products – I could see them in the category tree and even on the front end. It’s starting to look like a real site! The subcategories; however, were still empty.
At this point, I was ready to throw in the towel and hunker down to a night of manual data entry and categorization.
Attempt 4: Download the Sample File (Success!)
One last ditch effort. I remembered that on the import page in the Magento 2 Admin, there was a “Download Sample File” link. I didn’t think that this would be different than the export, but at this point, I was willing to try anything (see above when I was ready to manually categorize products).

I downloaded the file and looked at it. The category structure here was different than the export sheet! What?! This didn’t make sense, and I still don’t know why it’s the case; however, it’s got the answer. The smoking gun: No spaces.
Export Sheet: Default Category/Parent Category, Default Category/Parent Category/Sub Category, Default Category/Parent Category/Sub Category
Sample File: Default Category/Parent Category,Default Category/Parent Category/Sub Category,Default Category/Parent Category/Sub Category
There are no spaces between each of the category paths! That’s why the parent category had products with the previous attempt. The import was failing as soon as it was getting to the first space, and since parent categories were listed first, they were getting imported properly. That would have been a nice error message to have received.
One last “Find & Replace. Find “, “ (comma space) and replace with “,” (comma). I ran the import, crossed my fingers and held my breath, and success! It ran smoothly without errors. I cleared the cache, ran a command line reindex, and looked at the front end of the website. Lo and behold every category had products!
I double checked to make sure I wasn’t delirious and seeing what I wanted to see. Once I was sure that it ran successfully and had the outcome I expected, I ran to the team and had a dance party!

I went down the rabbit hole, and came out the other side. I learned that ‘third time’s the charm’ is a bunch of baloney, that database backups before imports are essential, and that “Find & Replace” in spreadsheets is the only way to get through data work.
I’ve done my fair share of Magento imports (read ‘struggled through’), and one thing has always been true – every data import is different. Magento expects the data in a very specific way, and isn’t always clear on what that specific way is. Hopefully my struggles through this product to category association import saves you some frustration and grey hairs. If you’ve got any questions, are having struggles with your data imports, or have any tips or tricks to save me time in the future, please share in the comments.