 If you recently migrated to Magento 2, you’ve likely screamed “WHAT HAPPENED TO MY ADMIN?” a few times.
Because while Magento 2 was an amazing upgrade for eCommerce stores utilizing the platform, with change often comes a bit of confusion. And once you’ve started maneuvering through the new Magento store, you’re going to notice that a few of the things that were once in one place, are no longer. Somebody moved your cheese.
If you have been wandering through the Magento 2 admin panel looking for your favorite settings and configurations to no avail, we got you. Just take a couple deep breaths, and follow this guide to find your way. Human Element is here to help.
Stores
Configuration
Magento 1 Location: System > Configuration
Magento 2 Location: Stores > Settings > Configuration
Anyone who spent time in the Magento 1 admin panel knows that System Configuration was an absolute goldmine of menus for the entire store. This has been scaled back a bit in Magento 2 (notes on that later), but experienced users will find most of the same options and configurations in this new location (Catalog Settings, Customer Settings, Sales Settings, Extension Configurations, etc.).
Attributes
Magento 1 Location: Catalog > Attributes > Manage Attributes -OR- Customers > Attributes > Manage Attributes
Magento 2 Location: Stores > Attributes
This is definitely a time saver once you remember to click on the correct menu in the admin. Whereas before you were required to navigate to attributes through separate menus, now all Attribute links (Product, Customer, Customer Address, Return, Rating, and Attribute Set) are located in one convenient location.
Taxes/Currency
Magento 1 Location: System > Configuration
Magento 2 Location: Stores > Taxes -OR- Stores > Currency
This is one of those instances where configurations were pulled out of the generic “System>Configuration” menu and into their own section, again saving time once you get the hang of the new location.
Customer Groups
Magento 1 Location: Customers > Customer Groups
Magento 2 Location: Stores > Other Settings > Customer Groups
It took me awhile to remember not to look in the Customer menu for Customer Group settings on this one. Still, it’s accessible from the main navigation and is only one click away. Additionally, all of the settings and functionality are the same. Now I’ll get all kindergarten teacher on you to help you remember where this is:
“Stores” want “Groups” of customers, not just one.
That great bit of wisdom is complimentary.
Products
Advanced Inventory
Magento 1 Location: Product Edit Page > Inventory Tab
Magento 2 Location: Product Edit Page > Link to “Advanced Inventory” below Quantity.

Overall, you’ll find that the tabs have been moved into an accordion menu below the standard options for products. Inventory however, did not make the cut to have its own special place in the accordion. Clicking on the “Advanced Inventory” link will open a sub menu on an overlay page where you can find all of the familiar inventory settings.
Configurations/Associated Products
Magento 1 Location: Product Edit Page > Associated Products Tab
Magento 2 Location: Product Edit Page > Configurations Menu
The primary change here is that building new simple products while editing the configurable product is much more robust. The new “wizard” approach has the admin user create new configurations through the following steps:
- Select Attributes (These define the simple product, i.e. Medium/Blue)
- Attribute Values (Select the different sizes, colors, etc. available on that product).
- Bulk Images, Price and Quantity (Set prices/images/quantity across the board or individually for each simple product).
- Summary (Review Configurations before adding)
The ability to add simple products in bulk while editing the configurable product in Magento 2 is a huge improvement from Magento 1.
Associating existing simple products to a configurable product works much in the same way that Associated Products functioned previously.
Customers
Customer Password Change
Magento 1 Location: Customer Edit Page > Password
Magento 2 Location: Customer Edit Page > Password (Top Menu Bar)
For security reasons, admin users are now unable to change passwords for customers. Clicking “Reset Password” on the customer edit page will send an email to the email address on their account. Double check the email account with the customer to make sure it’s going to the right user.
Content
Themes/Configuration
Magento 1 Location: System > Configuration > General > Design > Themes
Magento 2 Location: Content > Design > Configuration
After learning this new location, you’ll find that one click is a whole lot better than two. By not loading the massive System > Configuration page, you’re already saving minutes between the initial load and any saving/editing. This particular menu is also made simpler by breaking out the store scope into separate rows on the same page, instead of requiring the user to change the scope via dropdown.
CMS
Magento 1 Location: CMS
Magento 2 Location: Content > CMS
While it used to have its own menu, this isn’t a problem, and it saves space in the left navigation of the admin. Other than that, users will feel right at home with the functionality.
Marketing
Promotions
Magento 1 Location: Promotions
Magento 2 Location: Marketing > Promotions
Email Templates
Magento 1 Location: System > Transactional Emails
Magento 2 Location: Marketing > Communications > Email Templates
No major changes in functionality, but some of the template names have changed, and new ones have been added. MageTraining has compiled a list of all transactional email templates within Magento 2, complete with a quick walkthrough video:
URL Redirects/Rewrites
Magento 1 Location: Catalog > URL Redirects
Magento 2 Location: Marketing > SEO & Search > URL Rewrites
Same stuff, new home and new name.
Sitemap
Magento 1 Location: Catalog > Google Sitemap
Magento 2 Location: Marketing > SEO & Search > Site Map
System
Import History – New Feature
Magento 1 Location: You didn’t have this feature in Magento 1, but you’ll be retroactively wishing that you did.
Magento 2 Location: System > Data Transfer > Import History
Magento imports/exports have been improved across the board in Magento 2. Both speed improvements, and a more straightforward interface for building imports and exports will have you using these out-of-the-box tools more often than before. The proverbial cherry on top of all this is “Import History” which gives admin users the ability to view and download all prior imports, both manual and scheduled.
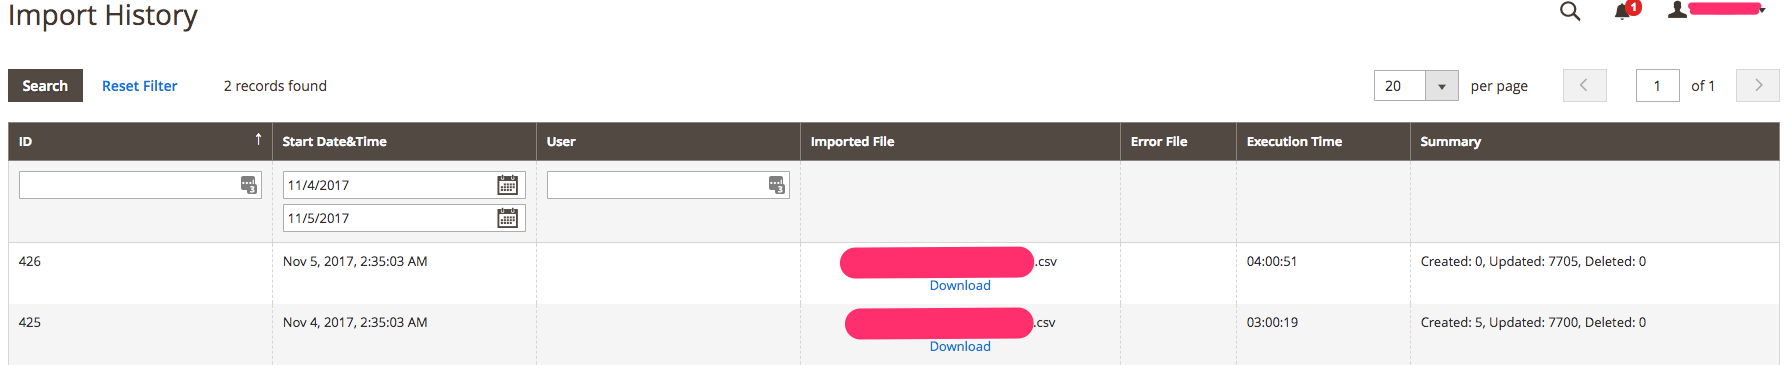
This tool can be integral in troubleshooting product and customer issues on the site by allowing admins to track down exactly when certain changes were made.
Overall, the Magento team has done a great job of leveling out the significance of each menu within the admin. It may take some getting used to, but you’ll spend less time in that hulking, cumbersome configuration. Hopefully this guide has helped you track down the locations of all your favorite admin functions, and maybe some you didn’t know existed.